Battery switch on travel trailer function is crucial for managing your RV’s power. Understanding how your battery switch works—whether it’s a rotary, rocker, or digital model—is key to preventing electrical issues and maximizing your off-grid adventures. This guide breaks down everything you need to know, from basic operation to advanced troubleshooting and maintenance.
We’ll cover different switch types, their pros and cons, how to safely operate them, and what to do when things go wrong. We’ll also explore how your battery switch interacts with solar panels and inverters for a complete understanding of your RV’s electrical system. Get ready to become a battery switch expert!
Types of Battery Switches in Travel Trailers: Battery Switch On Travel Trailer Function
Choosing the right battery switch for your travel trailer is crucial for managing your power efficiently and safely. Different types offer varying levels of control and complexity, each with its own set of pros and cons. Understanding these differences will help you select the best option for your needs.
Rotary Battery Switches
Rotary switches are a classic choice, offering a simple, mechanical way to switch between battery banks. They typically feature a rotating dial that selects which battery (or combination of batteries) is connected to the trailer’s electrical system. These switches are generally inexpensive and reliable, making them a popular option for many RVers. However, they lack the finer control offered by more advanced systems.
The installation is straightforward, usually involving wiring the switch into the main power lines. A common drawback is the relatively limited number of positions they usually offer, typically only allowing selection between one battery, both batteries, or neither.
Rocker Battery Switches
Rocker switches offer a more modern aesthetic and can be easily integrated into existing switch panels. They typically use a simple on/off mechanism for each battery bank. This setup allows for independent control of each battery, offering more flexibility than a rotary switch. While generally reliable, rocker switches can sometimes be more expensive than rotary switches, particularly if you need multiple switches for several battery banks.
Installation is similar to rotary switches, involving connecting the wires to the appropriate terminals.
So, you’re prepping for your next adventure? Awesome! First things first: make sure your travel trailer’s power is sorted. Understanding the battery switch on travel trailer function is crucial for keeping your lights on and fridge cold. Once that’s dialed in, let’s talk tunes! For the ultimate road trip experience, check out this guide on building an amazing audiophile travel setup to enjoy your favorite music on the open road.
Seriously, it’ll elevate your whole trip.
Digital Battery Switches, Battery switch on travel trailer function
Digital battery switches represent the most advanced option, offering precise control and monitoring capabilities. These switches often include features such as voltage monitoring, load sharing, and remote control options. The increased complexity and functionality typically come at a higher cost. Installation can be more involved due to the need for proper wiring and potential programming. However, the advanced features can be invaluable for managing power in complex setups, especially those with multiple batteries and high-power appliances.
Comparison Table
| Feature | Rotary Switch | Rocker Switch | Digital Switch |
|---|---|---|---|
| Cost | Low | Medium | High |
| Ease of Installation | Easy | Easy to Medium | Medium to Difficult |
| Control | Limited | Independent per bank | Precise, often with remote control |
| Monitoring Capabilities | None | None | Voltage monitoring and more |
| Durability | High | High | High (assuming quality components) |
Battery Switch Functionality and Operation
Understanding your travel trailer’s battery switch is crucial for managing power and preventing electrical issues. This section details the operation of a typical switch and the importance of safety procedures.A battery switch acts as a central control point, allowing you to selectively connect and disconnect your house battery (powering interior lights, appliances, etc.) and your chassis battery (powering essential vehicle functions like brakes and lights).
Proper use prevents accidental drain on one battery from the other and ensures optimal power management.
Operating a Typical Battery Switch
Operating a battery switch is generally straightforward. Most switches feature multiple positions, often labeled with clear indicators like “Off,” “House,” “Both,” and “Chassis.” To turn on the house battery, you’d move the switch to the “House” position, connecting it to the house battery bank and allowing power to your interior systems. Switching to “Both” connects both batteries, providing more power for demanding appliances.
“Chassis” connects only the chassis battery, while “Off” disconnects both. Always refer to your specific switch’s labeling for precise instructions.
Power Flow Management Between Batteries
The battery switch manages power flow by acting as a physical connection point. In the “Off” position, both batteries are electrically isolated. In the “House” position, the switch creates a path only for the house battery’s power to flow to the house systems. In the “Both” position, it creates a path for both batteries to power the house systems, while the “Chassis” position only allows power from the chassis battery to the trailer’s chassis systems.
This prevents accidental discharge of one battery by the other, extending battery life and preventing malfunctions.
Safety Precautions When Operating a Battery Switch
Always turn off the battery switch before performing any maintenance on the electrical system of your trailer. This prevents accidental shocks and short circuits. Before switching positions, ensure your hands are dry to avoid electrical shocks. Never force the switch; if it’s difficult to move, investigate the cause before proceeding. Consult your trailer’s manual for specific safety instructions relevant to your model.
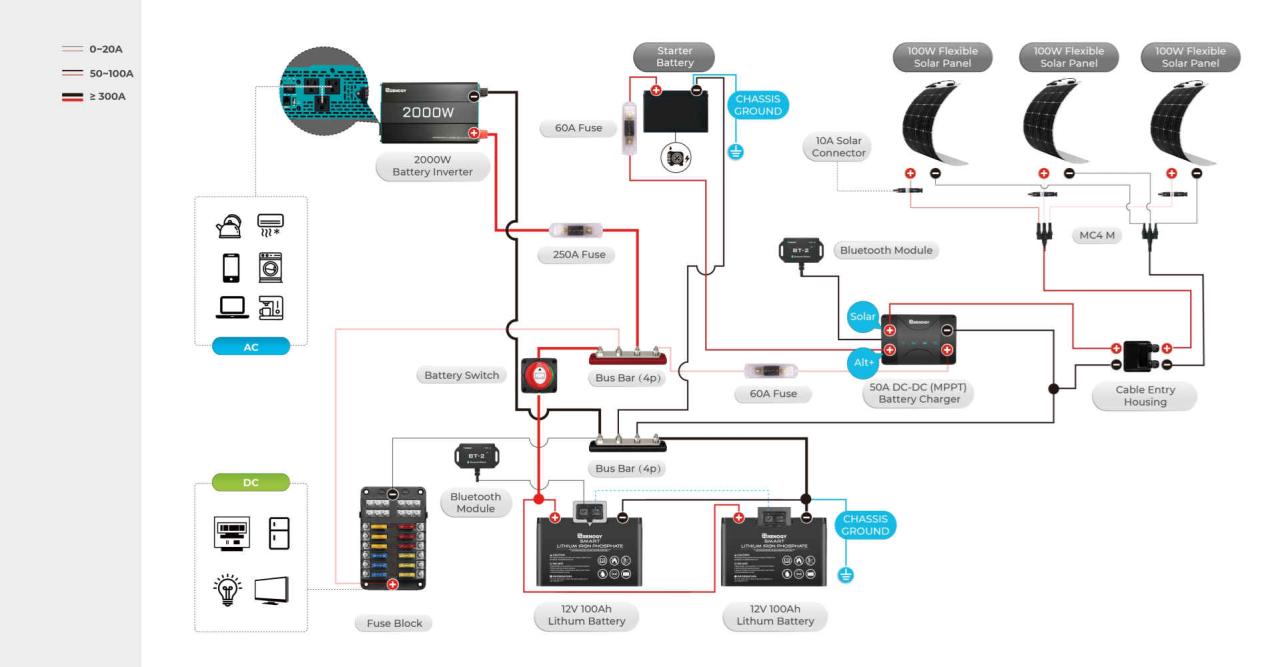
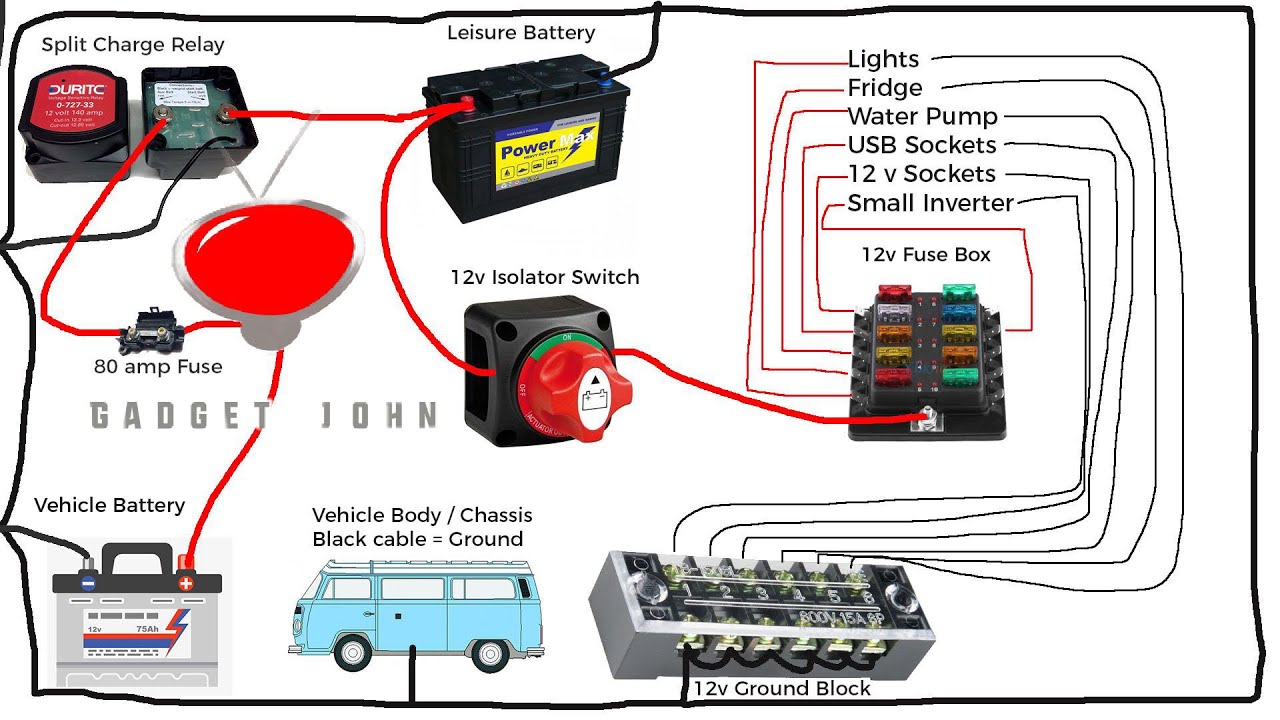
Diagram of Power Flow Through a Battery Switch System
Imagine a simple diagram: Two battery symbols (House and Chassis) are shown. Each battery is connected by a wire to a three-position switch. The switch is then connected to a load symbol (representing the house systems of your travel trailer). Three lines extend from the switch, labeled “Off,” “House,” and “Both.” * Off: Both wires from the batteries are disconnected from the load.
House
The wire from the House battery is connected to the load; the wire from the Chassis battery remains disconnected.
Both
Both wires from the House and Chassis batteries are connected to the load, supplying power from both sources. (A “Chassis” position would mirror the “House” position, but connect only the Chassis battery to the chassis-specific load).This illustrates the basic principle of selective connection and disconnection provided by the battery switch. The exact configuration may vary depending on your specific setup, but the fundamental principle remains the same.
Battery Switch Maintenance and Replacement
Keeping your travel trailer’s battery switch in good working order is crucial for reliable power. Regular maintenance prevents problems and extends the lifespan of your switch, saving you time and money in the long run. Neglecting maintenance can lead to unexpected power failures, leaving you stranded.
Regular Battery Switch Maintenance Schedule
A simple inspection and cleaning of your battery switch should be part of your regular pre-trip checklist. More involved maintenance might be needed less frequently, depending on the environment and usage. Here’s a suggested schedule:
- Pre-Trip Inspection (Every Trip): Visually inspect the switch for any loose connections, corrosion, or damage. Tighten any loose terminals and clean off any corrosion with a wire brush and baking soda solution.
- Annual Inspection and Cleaning: More thorough cleaning, including removing the switch cover (if applicable) to clean all internal components. Apply a dielectric grease to terminals to prevent corrosion.
- Every 3-5 Years (or as needed): Depending on the environment (e.g., high humidity, salty air) consider replacing the switch as a preventative measure. Signs of significant corrosion or difficulty operating the switch indicate it’s time for a replacement.
Replacing a Faulty Battery Switch
Replacing a battery switch isn’t overly complex, but it’s essential to follow safety precautions to avoid electrical shocks or injury. Disconnect the battery’s negative terminal before starting any work. This crucial step prevents accidental short circuits.
So, you’re prepping for your next adventure? Awesome! First things first: make sure your travel trailer’s power is sorted. Understanding the battery switch on travel trailer function is crucial for keeping everything running smoothly. Once you’ve got that nailed, it’s time to think about entertainment. For a truly immersive experience, check out this guide on creating an audiophile travel setup – it’ll transform your road trips into concert halls on wheels!
Tools and Materials Needed for Battery Switch Replacement
Proper tools are essential for a safe and efficient replacement. Using the wrong tools can damage the switch or even cause injury. Always prioritize safety.
- Wrench Set: You’ll need wrenches that fit the battery terminals and the switch mounting bolts. The size will depend on your specific switch and battery.
- Screwdrivers (Phillips and Flathead): These are commonly needed for removing switch covers or mounting brackets.
- Wire Brush: Used to clean corrosion from the battery terminals and switch contacts.
- Baking Soda and Water Solution: A simple and effective cleaner for battery terminals.
- Dielectric Grease: Prevents corrosion on the terminals and ensures good electrical contact.
- Replacement Battery Switch: Ensure you purchase a switch with the correct amperage rating for your battery system.
- Safety Glasses and Gloves: Essential for protecting your eyes and hands from potential hazards.
Steps for Replacing the Battery Switch
Remember to always disconnect the negative battery terminal first! The specific steps may vary slightly depending on the switch type and installation, but the general process includes:
- Disconnect the Battery: Disconnect the negative (-) terminal of your battery first. Then disconnect the positive (+) terminal.
- Remove the Old Switch: Loosen and remove the bolts or screws holding the old switch in place. Carefully disconnect the wires from the old switch, noting their positions.
- Clean the Terminals: Use a wire brush to clean the battery terminals and the switch mounting surface. Apply the baking soda solution to further clean the terminals.
- Install the New Switch: Mount the new switch in the same location as the old one. Connect the wires to the new switch, ensuring they are connected correctly (match the wire colors or positions from the old switch).
- Reconnect the Battery: Connect the positive (+) terminal first, then the negative (-) terminal.
- Test the Switch: Turn the switch on and off to ensure it is functioning correctly. Check all battery connections and look for any signs of sparking or loose connections.
Safety Considerations with Battery Switches
Working with batteries, especially in a travel trailer where space is limited and potentially damp, requires a heightened awareness of safety. Improper use of a battery switch can lead to serious consequences, including electrical shocks, fires, and damage to your RV’s electrical system. Understanding the potential hazards and implementing proper safety practices is crucial for a safe and enjoyable RV experience.Improper battery switch usage presents several significant risks.
A poorly installed or maintained switch can lead to arcing, sparking, and overheating, potentially igniting flammable materials nearby. Furthermore, a faulty switch could create a short circuit, leading to significant damage to your batteries, wiring, and other electrical components. In the worst-case scenario, this could result in a fire. Incorrect connections can also cause battery acid leakage, posing chemical hazards.
Proper Grounding and Bonding
Proper grounding and bonding are essential for safety in any electrical system, and a travel trailer’s battery system is no exception. Grounding provides a path for stray electrical currents to safely return to the earth, preventing dangerous voltage buildup. Bonding connects metallic parts of the RV’s structure to equalize electrical potential, preventing stray currents from flowing through unintended paths. A lack of proper grounding and bonding can increase the risk of electrical shock, and even lead to corrosion in your electrical system.
Imagine a scenario where a faulty wire touches a metal component of your trailer; without proper bonding, a significant voltage difference could exist between that component and other grounded parts, creating a potential shock hazard.
Risks of Connecting Incompatible Battery Types
Connecting incompatible battery types to a single switch is a serious safety hazard. Different battery types have different voltages and chemistries. Connecting a 12-volt lead-acid battery to a 6-volt battery, for example, could result in damage to one or both batteries, potentially causing overheating, gas generation, and even an explosion. Mixing different chemistries, such as lead-acid and lithium-ion, can also lead to unpredictable reactions and safety issues.
Never attempt to connect batteries with different voltages or chemistries without consulting a qualified electrician.
Safety Guidelines for Working with Battery Switches
Before working on any battery system, it is crucial to follow a series of safety guidelines. These practices will help to minimize the risk of accidents and injuries.
- Always disconnect the negative terminal of your batteries before working on any battery switch or related components. This is the most important step in preventing accidental shocks and short circuits.
- Wear appropriate safety gear, including safety glasses and gloves, when working with batteries and battery switches. Battery acid is corrosive and can cause serious injury.
- Ensure adequate ventilation when working with batteries, as they can emit flammable gases.
- Never work on a battery switch while the batteries are connected to a load. Always turn off all appliances and disconnect the load before working on the system.
- Inspect all connections regularly for corrosion and loose wires. Clean and tighten any connections as needed. Corrosion can increase resistance and generate heat, potentially leading to a fire.
- Consult a qualified electrician if you are unsure about any aspect of your battery system or battery switch installation or maintenance.
Mastering your travel trailer’s battery switch is about more than just flipping a switch; it’s about ensuring reliable power for your adventures. By understanding the different types, operating procedures, troubleshooting techniques, and safety precautions, you can confidently manage your RV’s electrical system and avoid costly repairs. So, get out there and enjoy the freedom of the open road, knowing you’re in control of your power!
FAQ Summary
What happens if I accidentally connect the wrong batteries to the switch?
Connecting incompatible batteries (like a deep-cycle and a starting battery) can damage the batteries and potentially the switch itself. Always check your battery types before connecting them.
How often should I test my battery switch?
It’s a good idea to visually inspect your battery switch for corrosion or loose connections every few months. Test its functionality with a multimeter at least once a year.
Can I replace my battery switch myself?
Yes, but it requires basic electrical knowledge and caution. Disconnect the battery before working on the switch. If you’re unsure, consult a qualified RV technician.
My battery switch is making a clicking noise. What’s wrong?
A clicking noise often indicates a problem with the switch itself or a low battery voltage. Check your battery voltage and consider replacing the switch if the problem persists.
